Multi Container Apps with Docker Network
What you will learn ?
- What is a Docker Network & how to create it ?
- How to create a SQLite container and attach it to a Docker Network ?
- How are containers connected ?
Generally applications use some type of database which maybe of type SQL or NoSQL. In our sample Node js application we use SQLite database. As we have seen here we created a container for Node Js. Similarly in this blog we will create a SQLite container and connect it to the Node js container using Docker Network.
Docker Network
Docker Containers run in isolation and aren't aware about other processes or containers running on the host system. So how can we connect the Node and SQLite containers ? That's where Docker Network comes into play, because containers can talk to each other only if they are on the same network.
Practical example using Docker Network
- Create a Docker Network
docker network create network_name eg. docker network create todo-app-net - Create a SQLite container and attach it to Docker Network
docker run -d --network network_name --network-alias network_altername_name -v volume_name:database_directory -e MYSQL_ROOT_PASSWORD=password -e MYSQL_DATABASE=database name base_image eg. docker run -d --network todo-app-net --network-alias mysql -v todo-mysql-data:/var/lib/mysql -e MYSQL_ROOT_PASSWORD=secret -e MYSQL_DATABASE=todos mysql:5.7 - Check if SQLite container is running
docker ps Returns value : 868dee8b74d9 docker exec -it container_id network_alias -u root -p eg. docker exec -it 868dee8b74d9 mysql -u root -p (when prompted enter the password i.e "secret" from step 2)mysql> SHOW DATABASES;+--------------------+ | Database | +--------------------+ | information_schema | | mysql | | performance_schema | | sys | | todos | +--------------------+ 5 rows in set (0.00 sec)mysql> EXIT;
Identify IP address of network on the container
Start a new container using the nicolaka/netshoot image. Make sure to connect it to the same network (i.e. todo-app-net)
docker run -it --network network_name image_name
docker run -it --network todo-app-net nicolaka/netshoot
This container is used to identify the IP address of the SQLite container on the same network.
Inside this container, will use the dig command, which is a useful DNS tool. We’re going to look up the IP address for the hostname mysql.
dig network_alias
eg. dig mysql
Output :
mysql.                  600     IN      A       172.21.0.2
Docker was able to resolve to the IP address of the container that had that network alias mysql. This means that our app/Node js container simply needs to connect to a network named mysql and it’ll talk to the database.
Create Node container and connect it to the database
- Go into the directory that contains the Dockerfile for the App
cd /dir eg. cd /DevOpsBootcamp/getting-started-master/app - Create the container and attach it to the database
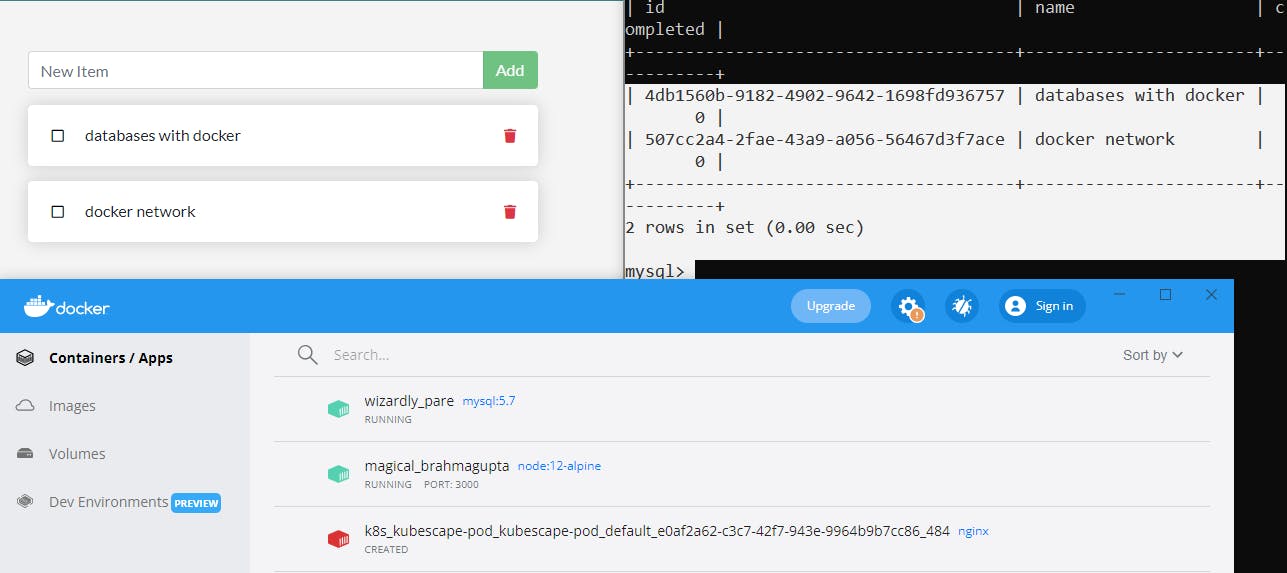
docker run -dp 3000:3000 -w /app -v "$(pwd):/app" --network todo-app-net -e MYSQL_HOST=mysql -e MYSQL_USER=root -e MYSQL_PASSWORD=secret -e MYSQL_DB=todos node:12-alpine sh -c "yarn install && yarn run dev" - Open the app in your browser and add a few items to your todo list.
- Connect to the mysql database and prove that the items are being written to the database. (when prompted enter the password i.e "secret" from step 2)
docker exec -it conatiner_id network_alias -p database eg. docker exec -it 868dee8b74d9 mysql -p todos - Query the database
mysql > select * from todo_items;
In practice Docker Compose is used for this purpose which is a easier way to achieve the above.
Do give this a try before working with Docker Compose as it will help you to understand it better. Thank you !!
